Search the Community
Showing results for 'SendIR command'.
-

Harmony confusion -- which programming method to use?
sasaba replied to joek's topic in Remote Controls
I have been experimenting and it looks like you can manually add new commands to the Harmony Flirc profile just like other Harmony profiles. I was afraid that if a remote button was mapped to a command/key in Flirc using the GUI or CLI that the new configuration would completely override the firmware default mappings that the Harmony profile relies on but it appears to not be the case. I have been able to add new commands/codes to the Harmony Flirc profile from within MyHarmony using the "add a command" function under Devices or Buttons which allows the Harmony to learn new codes from another remote. Then I use the Flirc GUI or CLI to map the new button/code to the key/command I want Flirc to send. An example is that I created a "Wake" command in the Harmony Flirc profile and learned the power on code from another remote to the Harmony. I then went into the Flirc CLI (also was able to repeat with the GUI) and recorded this new Harmony button to the "Wake" key. All the other default commands remain active and the keys command in the CLI just shows the new keys added. I hope this make sense (maybe everyone already new this) because it allows the use of the current Harmony profile to generate the majority of your Harmony commands and you only have to add the missing ones instead of trying to come up with another good base remote profile like the "Panasonic TV" remote etc. Overall I think that there will be less commands that need to be added. I guess basically this is a composite of the two solutions for setting up a Harmony remote. Along with murkyl's post above this appears to open up a whole range of customizing possibilities w/o having to start from complete scratch on the the more basic/common commands. I have not tried to assign a button that is sending an existing/default Harmony profile command/code to a new key/command in the Flirc GUI or CLI (like ContextMenu to key "M" instead of "C") nor have I tried to create a new Harmony command/code and assign it to an already existing default firmaware key/command (like Home to "Back"). -
No dice. recorded it with the linux version and it still records it as 0. 09-10 09:39:14.822 457 639 D AmzPhoneWindowManager: interceptUnhandledKey: 0 Also, here's the message I get with the windows version: C:\Program Files (x86)\Flirc>flirc_util.exe record_api 0x2 0x129 Consumer Usage Table: 0x129 [E] lib/libtransport/transport.c _dev_send_cmd(223): Wrong response: 'getversion' hit a key on the remote to be paired with 0 0 [E] lib/libtransport/transport.c _dev_send_cmd(223): Wrong response: 'ir_state' [E] lib/libflirc/firmware/fw_4.9.c fl_ver4_set_record_api(108): command error When I tried to re-record it and forgot to erase first. Interesting it says paired with 0 0. vwmofo@DiscoPickle:/usr/bin$ ./flirc_util record_api 0x2 0x129 Consumer Usage Table: 0x129 [E] lib/libflirc/firmware/fw_4.0.c fl_ver4_set_interrupt(377): Error: button already exists hit a key on the remote to be paired with 0 0
-
How to use EventGhost and Flirc for maximum XMBC awesomeness. OK folks, I’ve been really waiting for a way to interface FLIRC with XBMC. Unfortunately, the buttons that the FLIRC program provides for XBMC are pretty limited; most universal remotes come with a bajillion buttons that aren’t used under normal conditions for XBMC. Additionally, some buttons don’t really have counterparts in FLIRC or the keyboard, such as YELLOW, BLUE, RED and GREEN. Finally, the practice of editing keymaps.xml or whatever XBMC uses is painful. Because of this, I wanted to interface EventGhost’s XBMC2 plugin as well as FLIRC to maximize the capacity of my remote. Requirements: FLIRC – Duh. XBMC – Double Duh. EventGhost - WINDOWS ONLY, I don’t know any comparable linux or mac software, and don’t ask me about it. A remote control - I am using Vizio Remote Control XRV1TV 3D ($20 on amazon), which comes with the normal remote keys and a qwerty keyboard on the back. This remote is pretty kickass since it has QWERTY if you need it, and is purely IR-based, so FLIRC can program all the buttons for it. However, programming the QWERTY remote makes it more difficult than a regular universal remote. If someone could just create a sexy universal IR remote with QWERTY keys underneath it, it would make me so happy. Unfortunately, no such remote exists, and these VIZIO remotes are probably the best I’ve seen for this purpose. Someone needs to make a kickstarter for these. Technical Background: FLIRC processes signals from your remote control and turns them into keypresses on a virtual keyboard. Eventghost can intercept those keypresses using the Keyboard Plugin, and with the correct addons, can re-translate those button-presses into any arbitrary action you want. In this case, I’ll use it to program specific XBMC-related keys, but this could be extended to many other things, as long as you figure out how to do it in eventghost. Step by Step Instructions. I presume that you know how to navigate XBMC, FLIRC, and hopefully Eventghost. If not, ask someone more technically inclined to help you. 1. Verify that your remote control does not interfere with your TV! This step is very important; I found out after the fact that certain buttons on my Vizio remote work on my Element TV. Power, Info, Menu, Volume, Channel and some QWERTY keys all had effects on my TV. Since the remote isn’t programmable, there’s no way to avoid it. I used a marker to erase the labels on the buttons that had weird effects on my TV so I wouldn’t press them. If you are using a universal remote, try to select a code which has no overlap with your TV or other electronics. 2. Install FLIRC and verify it works with your remote. 3. Install XBMC and verify it works. Maybe setup your library and some videos for or something you can browse through or troubleshoot. 4. Program your basic remote keys on FLIRC. Programming your keys depends on whether you have an ordinary remote, or one with QWERTY keys. An ordinary remote is simple; just use FLIRC’s GUI to program all the keys that you can see direct equivalents for. For example, use the XBMC keyboard layout to program the keys in your remote. Don’t worry at this point if you have a lot of extra keys on your remote that don’t correspond to any keyboard keys. We’ll deal with them later. For the time being, try to map the buttons with the corresponding keys on the XBMC keyboard. (http://wiki.xbmc.org/index.php?title=Keyboard) For a QWERTY remote, the best way to do it is to program the QWERTY keys first, then program the non-qwerty keys (play, pause, ff etc) last. This way, you later have a way of determining which remote buttons collide (are mapped to the same key). Note that switching controllers on the FLIRC menu doesn’t change buttons you programmed on another controller. This means that you can use the extra set of buttons on the Windows Media Player controller and program it to your remote, then switch over to Full keyboard and program another set of keys without losing the WMP-labelled buttons. This allows you to map some extra keys easily. SAVE YOUR WORK AT THIS TIME. 5. Map out remaining keys with modifier keystrokes. Your remote should be pretty well-stocked to do the basics at this point. However, some buttons (color keys, special manufacturer keys etc) have no direct keyboard equivalents. Additionally, I might want to not use a particular button that is keyed to a QWERTY button. To bypass this limitation, let’s program our own keys for these buttons. I want to map out the Yellow button on my remote. To avoid collisions/overlap with other buttons, I’m going to use modifier keystrokes (control, shift, alt, windows keys etc). In this case, setting FLIRC to recognize Control-Alt-Shift-Y should be unique enough as a keystroke. Open FLIRC and go to full keyboard mode, and press the Control-Alt-Shift-Y keys on the on-screen keyboard. I then associate it with the Yellow Button on my remote. This set of keystrokes is unique enough that it is unlikely that any other program requires this keystroke. You can do this for any button, as long as it hasn’t been programmed or something. Feel free to play with any other key combination; I suggest using Control-Alt-Shift or Control-Alt-Win and go down the QWERTY keyboard to simplify mapping your buttons. SAVE YOUR WORK UNDER A DIFFERENT FILENAME SO YOU HAVE A BACKUP. 6. Install Eventghost and make a new configuration. Eventghost will give you some default configuration, which is actually pretty helpful if you want to tinker around and learn some things. But in our case, we’ll start from scratch and just click New Configuration. 7. Install the appropriate plugins. Now the only ones that we really need are Keyboard, the XBMC2 and the Task Create/Switch Events plugins. Feel free to replace the XBMC plugin with whatever one you are using (like WMP/VLC). We add Task Switcher for a later step to ensure that all buttons we map specifically to XBMC will only work when XBMC is run. At this point, you should see something similar to this. For now, right-click the XBMC2 folder, and press “Disable Item” so that we can program buttons easily. Remember to enable it later on. 8. At this point, press a button on your remote, and you should see something (an event) pop up on Eventghost’s left pane. For example, I mapped the Yellow remote button as the Control-Alt-Shift-U key, and if I press it, I see the command Keyboard.LShift+LCtrl+LAlt+U. Several lines pop up for this key combination, but just use the full command. (Ignore the LAlt and L+Alt+Printscreen stuff, this is just an artifact of taking screencaps). Whenever you press anything on your keyboard (real keyboard or FLIRC remote), this will pop up and be accessible as a command. 9. Earlier I mentioned I wanted to map the Yellow button on the remote to the “Movies” screen of XBMC. To do this, open the XBMC2 folder in Eventghost and go to Windows > Show Movies Screen. Press the Yellow button (or whatever button you want to map) to underneath the XBMC2.Show Movies Screen action. This associates pressing Yellow on the remote with XBMC’s Show Movies command. Repeat this for the other buttons you want. Once you are satisfied, right click the XBMC2 folder and enable it. Run XBMC and test the remote if you like (it helps if you run it in windowed mode (the key is “\”). Experiment with the button assignments until you are happy with it. Note that there are bajillion options you can try, which can be confusing, but with luck you can do it. Take a look at the XBMC keyboard map (http://wiki.xbmc.org/index.php?title=Keyboard) for whatever keys are being used by XBMC natively and try to work with or around them. Repeat as necessary for any other special keys you would like. In this way, I was able to program my remote for all the buttons I want. This step is insanely powerful; I can associate any unique keystroke I want with an XBMC action, without it overlapping with the QWERTY keyboard. I can even arbitrarily associate keystrokes with windows functions (restart/reboot/suspend etc)! Just take note which keystrokes you have used for which buttons. Note: The Buttons>Remote section and the Actions>General sections have identical macros for some commands such as direction keys. If there are identical macros, map only one, otherwise you might get multiple keypresses from one button press. Warning: It is not a good idea to associate common keystrokes with eventghost commands, especially with QWERTY remotes. You may get collisions and key interceptions which are hard to diagnose (See last section of this document for details). I suggest leaving most keys unprogrammed, and only map the special 4-button combination keystrokes for those keys you want to remap. 10. Configure the Enable Exclusive commands. Create a new folder (I name it Context) and move the XBMC2 folder inside it. This is a needed step in order for us to use the Enable Exclusive commands. After that, create a new macro (the orange gear thingie) and select “Enable Exclusive folder/macro”, and in the next dialog box, select the XBMC2 folder inside the Context folder. This should give you a macro that says “Enable Exclusive:XBMC2.” Create another macro in the root directory and select “Disable”, and in the next dialog box, select the same XBMC2 folder as before. Start up XBMC, and alt-tab or go to windowed mode, and look at Eventghost’s log. It should have an action “Task.Activated.XBMC” which you should drag to the “Enable Exclusive:XBMC2” macro. Similarly, there should be a “Task.Deactivated.XBMC” which you should drag to the “Disable XBMC” macro. What was the point of this whole thing? If set up correctly, this tells Eventghost to only activate the XBMC remote commands when XBMC is the active window. Once XBMC is minimized/alt-tabbed/closed, the Disable XBMC macro disables the XBMC commands to prevent other apps from recognizing the keyboard commands. Although we used combination keystrokes to map certain buttons, there is still a small chance that a keystroke will be recognized by another program, and using Enable Exclusive will prevent some of that problems. Anything in the same folder at the same level as XBMC2 will be disabled by the Enable Exclusive when it is triggered, so you could put remote commands for another application there. Finally, if you want to map other buttons to work outside XBMC (such as power or others), simply put it outside the Context folder, and it will not be subjected to the Enable-Exclusive command. 11. Sit back and enjoy! (Or swear profusely and bugger with the configuration more.) Notes and Warning: 1. Since FLIRC acts as a virtual keyboard, and since Eventghost can’t distinguish between multiple keyboards, ALL YOUR COMMANDS ARE SENT AS IF YOU TYPED IT ON ANY OF YOUR KEYBOARDS. There isn’t any way (as far as I know) to respond to commands coming from Keyboard#1 separately from commands coming from Keyboard#2. In other words, Eventghost treats all keyboard commands as coming from the same source, and can’t distinguish keystrokes from different keyboards. To sidestep this, the Eventghost forums suggest using something called the HID plugin instead of the keyboard plugin, but it doesn’t seem to work for FLIRC, and I know nothing about it. 2. When using the keyboard plugin, note that Eventghost will intercept the keystrokes if they are assigned to a particular action. As stated in the Keyboard Plugin Description: “Notice: If such a keyboard event is assigned to a macro, the plugin will block the key, so Windows or another application will not see it anymore. This is needed to permit remapping of keys as otherwise the old key would reach the target in conjunction of another action you might want to do and this is mostly not what you intend. But this blocking only happens, if a macro would actually execute in succession of the event. So if the macro or any of its parents is disabled, the keypress will pass through.” In other words, if you’ve mapped a buttonpress, eventghost will intercept it, unless that button-press is disabled. If you forget this, you might wonder why you start missing letters or have strange program behavior when you are typing while eventghost is on. Since many keypresses are pretty much universal and standard (up, down, left right, enter etc) don’t program them, and remember to use the “Enable Exclusive” macro. Only reprogram the keys if necessary. This is a necessary consequence of Note#1, since we can’t do it in a keyboard specific way. 3. The main reason why QWERTY remote programming is more difficult than regular remote programming is you could have collisions between keystrokes (eg. the space button in the QWERTY keyboard works as the pause button in XBMC, but you might want them to be totally separate for your remote). You have to take note which keys correspond to which. Coupled with Note #2, this is why my suggestion is “Only reprogram the keys if necessary.” 4. I still don’t know how to associate XBMC addons to eventghost applications. For example, I want to figure out if I can map the Pandora or XBMCflix app to a button, but so far I don’t know. Online guides mention JSON or some other thing in Eventghost, but I can’t get any namespaces to appear in the JSON options in eventghost. 5. Eventghost has some features which can get around some limitations of FLIRC (Long keypresses, context-dependent button presses, button timing features), but its requires reading and diving into Eventghost. Using these options, I was able to get my HTPC and TV to turn on/off simultaneously with one button. However, the wakeup button requires setting the command-line interface (see elsewhere in the flirc forums on how to do that), and does not actually map a physical button keyboard, but some sort of device-based means to go from suspend mode to normal mode. 6. FLIRC still has some bugs which make the process a little tricky. For example, I had a FLIRC-related bug which prevented me from deleting and remapping several keys. Also, using the command line interface “keys” flag does not show keys with modifiers (see step 5), so try to remember the keystrokes you use for them. All and all, it can be done with some hard work and enough ADHD.
- 13 replies
-
- 2
-

-
- Eventghost
- XBMC
- (and 2 more)
-

FLIRC disconnected after going to sleep
Kevin Cowans replied to madmanuel's topic in General Questions
Hello Jason Thanks for the reply. I have tried running the command as Administrator with the same results. I usually run my HTPC in a Standard User Account (Auto Login) and I have tried running the command from there in an Elevated Command Prompt with no success. I have also Logged on to the Administrator Account on the HTPC and tried running the command there, again in an Elevated Command Prompt with the same issue. I hate being defeated :( Thanks in advance Kevin -
Looking at the ipad logs, this does look suspicious (see text in bold): Date/Time: 2022-08-21 08:57:49.762 -0600 End time: 2022-08-21 09:02:25.724 -0600 OS Version: iPhone OS 15.6.1 (Build 19G82) Architecture: arm64e Report Version: 35.1 Incident Identifier: 69EE6824-8C85-46ED-B9BF-2A55AD464A6C Share With Devs: Yes Data Source: Microstackshots Shared Cache: FA21C079-94F7-35A0-B38A-8B4CEF88650F slid base address 0x180538000, slide 0x538000 Command: backboardd Path: /usr/libexec/backboardd Architecture: arm64e Parent: launchd [1] PID: 66 Event: wakeups Action taken: none Wakeups: 45001 wakeups over the last 276 seconds (163 wakeups per second average), exceeding limit of 150 wakeups per second over 300 seconds Wakeups limit: 45000 Limit duration: 300s Wakeups caused: 45001 Wakeups duration: 276s Duration: 275.96s Duration Sampled: 274.89s Steps: 318 Hardware model: iPad14,1 Active cpus: 6 HW page size: 16384 VM page size: 16384 Advisory levels: Battery -> 2, User -> 3, ThermalPressure -> 0, Combined -> 2 Free disk space: 110.13 GB/238.40 GB, low space threshold 150 MB
-
Hello! Thank You so much, Flirc team, for this great little thing! I need to receive and send IR-commands to make my good old parents be able to 'Skype' on their TV. I am C programmer, so I am not worried (yet) about using that API-command. (Will use a Mini-PC with Win in order to allow Skype or Whatsapp to run.) Please allow me two questions: a) Will it work to use a cheap USB-powered IR-repeater to catch the signal from the Flirc (Gen 2) and send it out stronger again? b) Do you have some time-estimate when Generation 3 will come out with a full-featured 'IR Command Sending'? Thanks you so much!!! All (=) Love, Ernesto ~:) PS: Welcome to co-realize this project I need for my parents...
-

Can you configure Fire Tv Cube remote to work with the FLIRC?
Nathan replied to Langis's topic in Remote Controls
Seems like the problem with this method is that you couldn't stop the Fire TV from listening, so every command you sent to the HTPC would also go to the Fire TV. Easier solution is to use a universal remote, like the Skip 1s by Flirc, then use that to control everything. Then the Fire TV and HTPC could each have unique commands. -
Kodi profile power button needs to send keypress S
Nathan replied to _Shorty's topic in Ideas and Suggestions
You can flip from the Kodi profile to the Keyboard profile and train a remote button to enter the S command. edit: Oh, or are you saying you use that now, but it'd be nice if the Kodi profile did that without needing to switch? If so, fair point.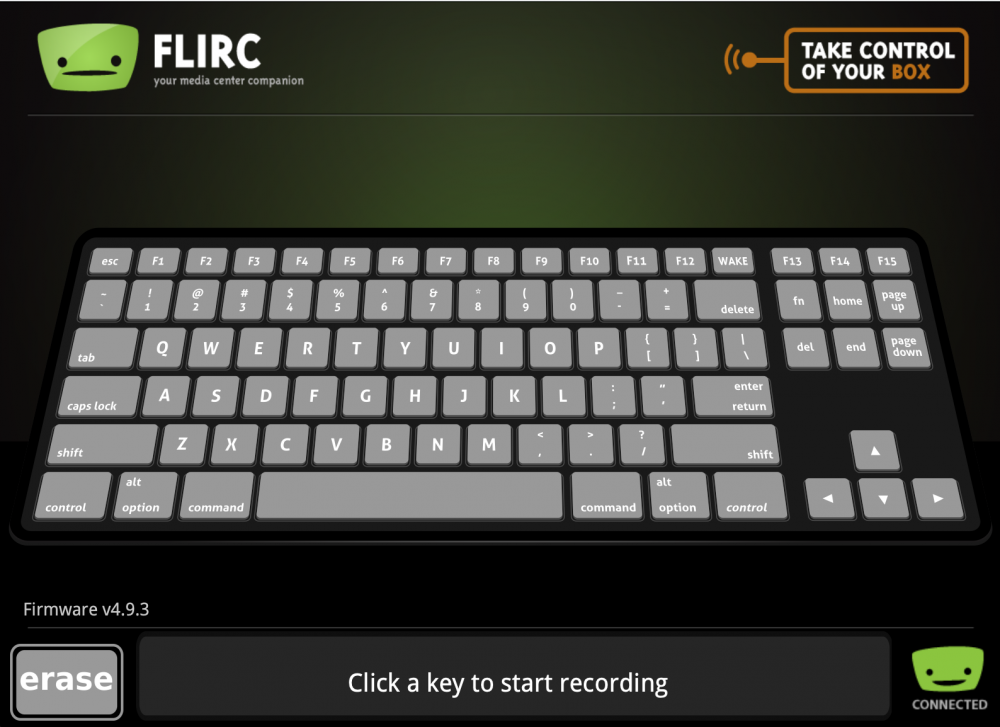
-
I'm trying to make sure we're on the same wave length here. Do you know what the Flirc USB is and that it can translate any IR input into any command - keyboard or otherwise - your computer can accept via USB? Given the existence of the Flirc USB, the need for the Kodi Keymap editor is likely nonexistent in a Skip + Flirc USB combo.
-
Hello and thanks a lot for the help, my sunrise uhd box is partically working, but unfortunately is my „back“ button not working as it should. in the menu i can exit with the back button on my harmony elite, but i can‘t go back in menus where it shoud really trigger the „back“ command and not the „exit“. i already tested some settings by the line command and record_api, but i never get the right record_api numbers in the command line. what‘s the best way to get the right number for the command?
-
If you have been wondering on how to make Kodi work with Flirc and Harmony remotes to automatically suspend without you having to call up the shutdown menu or be stuck with the other methods that limit suspend commands to the home screen of Kodi this is how to do it with Kodi v15 at time of writing. Thx to GoodOmens for the tip though his info is a little out of date now so this is a guide on how to do it all. Kodi/Openelec Go to system information and make a note of it's IP address Turn on SSH in Kodi services Harmony Software Devices Flirc Media Player Change Device Settings Power Settings I want to turn this device off when not in use I press the same button for on and off Add command and select PowerOff (if you have messed with poweroff before finding this guide choose the fix command and reset IR code for PowerOff) Sync remote Go to Flirc software Select file clear configuration Select full keyboard Select Ctrl+F12 (as Kodi wont respond to this at least not yet) Go to devices on Harmony remote and select Flirc media player then hit the power off key to map it to Ctrl+F12 (requires harmony with display screen or map power off to physical button) From Windows Download WinSCP Select SFTP Input Kodi IP address Username = root and password = openelec Once logged in select options\preferences\panels and tick the box for “show hidden files” Browse to /storage/.kodi/userdata/keymaps folder Create a file called remote.xml Copy and paste in the text below, then save (old floppy disk icon) <keymap> <global> <keyboard> <f12 mod="ctrl">XBMC.Suspend()</f12> </keyboard> </global> </keymap> Exit WinSCP Kodi/Openelec Reboot the system (required for new xml to take effect) Now if all goes well when using Harmony activities the system should go into suspend. If you've been wondering why not just use the stock Flirc/Kodi power off command combined with the Kodi settings\power saving changing it from shutdown to suspend, this doesn't work. If you go this path the system will always wake up when using any activity and not go into suspend, the stock power off command is bugged somehow like it's being sent multiple times.
-
 Hello, this is my first post, and it should definitely start with a big hurray to Flirc and it's developer(s?) as my Harmony One is finally able to control my recently purchased Fire TV, thanks to this little fellow! :wub: This said, as I'm new to Flirc, I encountered some problems, raising the following questions: 1) I can remap the commands of a selected profile regardless of whether 'Builtin profiles' is ticked or not. So what's the difference? Finally figured it out myself. Unticking 'Builtin profiles' disables the unmodified pre-mapped commands. Not sure what this is good for though ... 2) I understand that the Inter-key delay determines how long Flirc waits before sending the next keystroke to the device. But what about IR signals receivced in the meantime? Do the corresponding keystrokes become discarded? Or queued? It's hard to tell just by looking at the screen... :wacko: 3) No big deal, but with "Back" and "Channel prev" the AFTV profile holds two commands which utter the same keystroke, for no obvious reason...? 4) With AFTV's original remote, keeping the home key pressed for a few seconds a menu appears which provides three useful shortcuts: putting the device to sleep, screen mirroring, and settings. This long press-function is unfortunately not supported by the Home command of Flircs AFTV profile. However during testing I discovered it somewhere else. Unfortunately I removed the command at some point, and now I'm unable to relocate it. So I need some help here... Yes! I rediscovered it! Clearing the configuration made the PowerDn-Button of the Kodi profile work the way I remembered. Now the mapped Ctrl+F12 key-down events become constantly fired until the button on the remote is released, making it work exactly like AFTVs own home key!! As far as I understand this specific behaviour is hardcoded into the Flirc firmware, and can't be manually imported into the AFTV profile. So please fix this!! :wub: 5) The AFTV profile definitely lacks any dedicated wake up/sleep command! For waking up the device, it seems just about any keystroke can be send to the device, so finding one which Fire TV doesn't process any further should be easy. However, It's not that easy to map the keystroke to an additional ir signal if you don't have some otherwise useless remote control flying around somewhere in your home. Same applies to the missing sleep command of course. This is why it should be provided by the profile. This is something essential IMHO. 6) Speaking about the sleep command, I added (well, had to add...) the Wake/Suspend command provided by Flirc's Media Keys controller to the AFTV profile. On leaving the AFTV activity it puts my box to sleep. Works fine, however, since it's a toggle it's somewhat unreliable. Does anyone know if there's a dedicated keystroke that puts the AFTV to sleep, without the risk to wake it up instead? 6b) If the answer is no, is it possible to detect the active/standby state of the Fire TV box instead? Because this could be used to make the power on/off toggle split into two seperate dedicated buttons, which would be awesome!. Thank you for any replies!! :)
 -
i dont understand (just to be clear).. Unplug the device, Push the button, Plug it in while holding the button. continue holding the button while executing the command?
-
Setup: Flirc SE, Logitech Harmony 650, Windows 10 I'm trying to perform initial programming of the Flirc SE. The only command that seems to work is the one that doesn't use USB (i.e., the power switch). I've tried to program a few other keys on the full keyboard profile and none seem to do anything. What's strange is that the programming step appears to work just fine. For instance, I use Flirc software to program the J key with my desired remote command. Flirc software gives the recorded successfully status. I try to use the J command afterwards and it doesn't work. Tried several keys, all the same effect. The key appears to program, but doesn't do anything afterwards. Closing Flirc software and/or rebooting PC has no effect. I also tried installing Flirc again. It seemed to reinstall without issue. Edit: Just tried Passmark Keytest to check the raw key presses. Nothing registers. At this point, my assumption is that I'm doing something wrong, possibly stupid. Please advise.
-
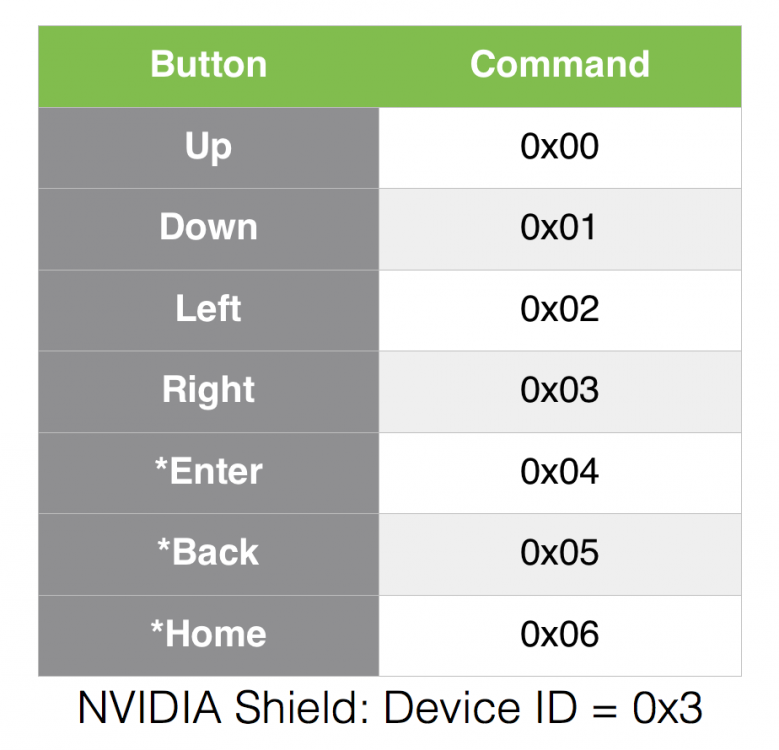
Yeah. Here is what you need to do. You need to hook up Flirc to your PC. Flirc is going to become an IR transmitter. You're going to put the B&O remote's receiver facing the flirc, right up against it, and put it in learning mode. NVIDIA's profile has 7 buttons, attached a pic. Up, Down, Left, Right, Enter, Back, Home. You need to output the IR waveforms for these buttons. I've attached a text file: nvidia.txt In this text file, it shows the 'command number' :: 'waveform' for example, the first line: 0x0 :: 0,4900,4900,840,1680,840,1680,840,1680,840,840,840,1680,840,1680,840,1680,840,6580,840,840,840,1680,840,840,1680,840,840,840,840,840,840,840,840,840,840,840,840,840,840 0 is the command up (as noted in the screenshot attached). the waveform follows after the '::' So we want to put your B&O into learning mode for the 'up' button. Then emit this waveform from flirc using my commandline application. Not sure which OS you're using, but you can use my documentation to find the commandline app: https://flirc.gitbooks.io/flirc-instructions/content/command-line-interface-guide.html To get Flirc to send that particular code, you'd issue the following command: flirc_util send_ir_raw 0,4900,4900,840,1680,840,1680,840,1680,840,840,840,1680,840,1680,840,1680,840,6580,840,840,840,1680,840,840,1680,840,840,840,840,840,840,840,840,840,840,840,840,840,840 If you were on windows, you'd need: flirc_util.exe send_ir_raw 0,4900,4900,840,1680,840,1680,840,1680,840,840,840,1680,840,1680,840,1680,840,6580,840,840,840,1680,840,840,1680,840,840,840,840,840,840,840,840,840,840,840,840,840,840 Then you'd repeat the process for all of the keys. The transmitter in flirc isn't great. It's about 1mm wide. So remember, you have to have the B&O very close, line of sight. Let me know if that makes sense. Sorry for the delay, traveling.
-
I picked up a flirc as it was the only USB IR transceiver available online in my area and I wanted to do some experiments with home automation on a handful of devices that use infrared remotes, specifically LED lighting and an air conditioner. I've had great success with the lights and was able to reverse engineer the remote and write scripts to control them with the flirc. The air conditioner is a different story. Air conditioner remotes send huge packets with all of the current settings for the device. Unfortunately, this means the signal sent by my remote is more than 100 edges and flirc stops early and returns an error - I can't see the whole packet to reverse engineer it! Additionally, from my testing, it seems the firmware limits transmitted packets to 100 edges as well, so even if I could figure out the format, I wouldn't be able to send it back to the air conditioner - no bueno. Is there any possibility of being able to receive, or at least print to the debug log, more than 100 edges? Same for improving the transmit command to support longer packets? 100 seems like a very arbitrary choice, rather than something that was specifically called for based on available RAM on the device.
-
 Feel free to put any material in it for your help center, as that's where I got all the info to begin with. :) My blog post 1) Setup your Harmony Remote Add a new device in your Harmony setup. The brand is FLIRC, and the model is XBMC Edit your PS4 activity to use the FLIRC device to control your PS4 Go to the assign button menu, select "PS4", click on the MENU button, and assign it as "INFO" in the FLIRC device. (more info) https://flirc.zendesk.com/hc/en-us/articles/201676079-Harmony-Remote-Control 2) Setup the FLIRC device Download the FLIRC GUI Install the GUI first, before plugging device into your PC Start the FLIRC setup program Plug in your FLIRC dongle Align the Harmony infrared hub to the FLIRC dongle From the pull down menu, select "CONTROLLER", then choose "keyboard" (more info) https://flirc.zendesk.com/hc/en-us/articles/202923419-Controllers-in-the-Flirc-GUI At this point, assign Harmony buttons to the keyboard keys 3) Assigning Harmony Buttons On the FLIRC setup program, click on the Enter key on the keyboard Hit the OK button on the Harmony remote Program should respond by saying "button learned" Now the OK button is assigned! Repeat for all other keyboard keys that are used by the playstation. Here's a list: In the PS4 interface Action Keyboard Key Harmony Key Back Esc Exit Dual Shock 4 Options button F3 Yellow DS4 Share button Prt Sc/SysRq Record Back to inserted disk menu Pause/Break Menu Back Backspace Return Enter Enter OK Up Up arrow Up Left Left arrow Left Right Right arrow Right Down Down arrow Down In-movie controls Action Keyboard Key Harmony Key Pause/On-screen display Esc Exit on-screen display F1 Red Blu-ray pop-up menu F2 Green Disc options/Netflix Pagedown F3 Yellow, Channel - Netflix Pageup F4 Blue, Channel + Pause/On-screen display Backspace Return Bring up BD pop-up menu Up arrow Up Close BD pop-up menu Down arrow Down Moving in menus Right/left arrow Right/Left Enter Enter OK (more info) https://flirc.zendesk.com/hc/en-us/articles/203167509-Setting-up-Flirc-with-PS4 4) Assign the Pause/Break button Notice that the Pause/Break button is crossed out, that's because the GUI interface doesn't include that button for some reason. You'll need to assign that button through the command line interface: Exit the FLIRC setup program (a must) Access command line mode on your PC (select Accessories from the Start Menu and select Command Line, or run a command called "CMD") Go to directory where FLIRC is installed (usually /Program Files/FLIRC) ** when typing the first command, include the double quotes cd "program files" cd flirc Run the following command: flirc_util record pause Hit the Menu button on the Harmony remote 5) Connect the FLIRC dongle to PS4 The dongle too wide to fit the front slot on the PS4, you can: Remove the clear casing by prying it open with a small flat screwdriver so it'll fit Run an USB extension cable from the back Most of you probably know this but to turn off your PS4, hit the Menu button to get back to the main menu, then hit up to select the PS4's sub menu, and the power options is on the far right. That's it! Finally we have one remote to rule them all (except for starting the PS4)
-
- 2
-
-
I'm showing version 1.3.2 The full keyboard in the version I'm using is slightly different than the full keyboard I see when I view this: https://flirc.zendesk.com/hc/en-us/articles/202923419-Controller-presets-in-Flirc-GUI What I see on the bottom row of keys is: control - windows - alt - space bar - alt - windows - control The bottom row of key in the link shows: control - alt/option - command - space bar - command - alt/option - control That command key looks like it would be mighty fine to have if it's the root of my problem. I sent you another email with an attachment showing a screen shot of how far I was able to get using the command line. I don't know what's supposed to happen, if anything, once flirc_util record pause is entered into into the command line. An then, there are no instructions what to do after flirc_util record pause is entered into the command line. Is the flirc programmed based on that entry? What keyboard keyboard key needs to be paired after that, if any?
-
I own the Shield TV 16GB 2nd Gen and the Shield TV Pro 2nd Gen (I'm not using the Flirc with the Pro as it has a built-in IR receiver). I struggled for some time to properly set up the Flirc and Harmony 650 but have found a solution that has worked for me. This is what works for me: Run the MyHarmony app. Add the device: Manufacturer: Nvidia Model: Shield The MyHarmony app will ask if it is the NVIDIA SHIELD TV. Tell it "Yes" and you should see a full array of options for the buttons. Program the MyHarmony remote's activities and buttons as desired. Adjust the Shield TV's "start" activity to include: Shield TV Home command Adjust the Shield TV's "stop" activity to include: Shield TV Back command Shield TV Home command Run the Flirc program in connect the Flirc to be programmed. Under "Controllers" select NVIDIA Shield: Program each of the functions. Under "Controllers" select Kodi: Program all functions other than the Shield functions programmed earlier.
-

Harmony 650+flirc+openelec some buttons don't exist?
leaderdog replied to leaderdog's topic in Remote Controls
ok for those that want to know. I think I finally got it set up correctly. In Logitech MyHarmony Software: 1) I started a new profile (add a remote) 2) Add the device you need (set top box) (Tv) (AV Receiver) (Flirc Media Player = Flirc - Kodi) 3) Activities, set it up how you need it to work with your equipment for me it was Watch TV and Custom - HTPC 4) Activities - Customize this Activity - Flirc Power On should already be there, but it won't turn on the pc from standby. 4a) Add step. Device - Flirc Media Player, Action - Command, Value - Back (you can use anything, it's just triggering a key stroke to start the pc) save 5) Devices - Change Device Settings - Power Settings - I want to turn off this device when not in use - I press the same button for on and for off - 5a) Add command - PowerOff 5b) Add command - Select 5c) when in openelec select the power off button and move down to Suspend. Openelec seems to keep it on that setting. So when All off is initiated it will send the poweroff command bringing up the menu then selects Suspend to put your pc to sleep. It also works when you select Watch TV, pc goes to sleep. 6) Buttons - Customize Activity Buttons. I chose watch tv and Watch Movies (set as my HTPC) 7) Remote Buttons - Choose activities - HTPC 8a) Device - Flirc Media Player 8b) I dragged page up and page down to the ch + - that I wanted. (Menu button still won't work even trying to adjust it in Flirc) 9) Sync 10) I ended up adding the context menu to the red button in the flirc software. Openelec seems to be working fairly smoothly now. I hope this all makes sense and can be of some use to others that are easily confused like me ;) -

Strange (to me) Interaction Between Samsung and Shield Remotes
jason replied to jtconte's topic in General Questions
Can you describe this a bit more. Do you mean you recorded the command with flirc and my software? -
Hi, I'm using a Harmony 650 and I'm wondering if the customize option on the "Watch TV Activity" on the 650 where it sets up a Power on and power off actions, if under the Flirc Media player ,the "Action" = "Power On" or "Action" = "Power off" are two separate signals? Or is it the same signal and it's just used like a toggle to turn PC off if on and on if off. I'm trying to allocate the Flirc/HTPC power on and power off commands to 2 distinct buttons. But if they are the same signal i will not be able to map them through the Flirc. It will say button already allocated. And if it is a simple toggle command then it means it can't be use in conjunction with other devices through the Harmony remote. eg. you have 3 devices. TV, Flirc/HTPC and stereo sound system. You power them on but the Flirc misses the power on command. However, your TV and sound system are now on. If you press the same button again you might turn the PC/Flirc on but now the TV and stereo also get the second command and switch off. Your devices will remain out of synch until you use the original remotes to reset them. Which defeats the purpose of a universal remote. Erick
-
I'm having an identical problem. Interesting this is it "WAS" working fine. I'm at a lose to determine what has changed. I've unistalled and reinstalled a couple of times and reloaded the flirc firmware. WIndows 10. The device disconnects and reconnects after every yril cmd. :\Program Files (x86)\Flirc>flirc_util.exe settings 3.26.0 FW Version: v4.9.3 [E] lib/libtransport/transport.c _dev_send_cmd(223): Wrong response: 'getversion' [E] lib/libflirc/firmware/fw_4.0.c fl_ver4_header_peek(50): invalid address you idiot [E] lib/libtransport/transport.c _dev_send_cmd(223): Wrong response: 'getversion' [E] lib/libflirc/firmware/fw_4.0.c fl_ver4_header_peek(50): invalid address you idiot [E] lib/libtransport/hid.c hid_recv_packet(167): hid_recv_packet: wrong report id [E] lib/libtransport/hid.c hid_recv_packet(168): hidapi: The parameter is incorrect. [E] lib/libtransport/transport.c _recv_packet(126): _recv_packet: recv packet error = -1 [E] lib/libtransport/transport.c _dev_send_cmd(201): recv timeout [E] lib/libflirc/firmware/fw_4.0.c fl_ver4_header_peek(50): invalid address you idiot [E] lib/libtransport/transport.c _dev_send_cmd(223): Wrong response: 'ir_state' [E] lib/libflirc/firmware/fw_4.0.c fl_ver4_header_peek(50): invalid address you idiot SKU: Flirc 2.0 [dori] Branch: master Config: release Hash: 0xCB185BDE Settings: sleep detection: always enabled noise canceler: always enabled inter-key delay: N/A for current firmware variant: Flirc builtin profiles: NA Memory Info: NA product sku: Flirc 2.0 [dori] C:\Program Files (x86)\Flirc>flirc_util.exe unit_test [E] lib/libtransport/transport.c _dev_send_cmd(223): Wrong response: 'ir_state' [E] lib/libflirc/firmware/fw_4.9.c fl_ver4_set_record_api(108): command error [E] lib/libtransport/hid.c hid_recv_packet(167): hid_recv_packet: wrong report id [E] lib/libtransport/hid.c hid_recv_packet(168): hidapi: The parameter is incorrect. [E] lib/libtransport/transport.c _recv_packet(126): _recv_packet: recv packet error = -1 [E] lib/libtransport/transport.c _dev_send_cmd(201): recv timeout [E] lib/libtransport/hid.c hid_recv_packet(167): hid_recv_packet: wrong report id [E] lib/libtransport/hid.c hid_recv_packet(168): hidapi: The parameter is incorrect. [E] lib/libtransport/transport.c _recv_packet(126): _recv_packet: recv packet error = -1 [E] lib/libtransport/transport.c _dev_send_cmd(201): recv timeout [E] lib/libflirc/firmware/fw_4.2.c _fl_unit_test(141): error recording Flirc Not Okay [E] lib/libtransport/transport.c _dev_send_cmd(223): Wrong response: 'ir_state' *** Device Connected *** Firmware Version: v4.9.3 SKU: Flirc 2.0 [dori] Git Hash: 0xcb185bde *** Device Disconnected *** *** Device Connected *** Firmware Version: v4.9.3 SKU: Flirc 2.0 [dori] Git Hash: 0xcb185bde *** Device Disconnected *** *** Device Connected *** Firmware Version: v4.9.3 SKU: Flirc 2.0 [dori] Git Hash: 0xcb185bde <3>report_callback(227): pkt recv err <3>report_callback(227): pkt recv err
-
1) This should not happen. But there may be an issue with a specific remote. There may be some remotes that don't work that well with Flirc. From what I can see the remote you're using have some capabilities of universal remotes. You can set it to control different equipment. I would suggest you to try some different codes and check if it works better and is more stable. 2) How did you record the power button? Using the GUI or the command line tool? The GUI doesn't support Flirc-SE's power button capability at this time. It's because both Flirc USB (old one) and Flirc-SE share the same firmware and most of the hardware (SE only adds few elements needed for power button emulation). There's no easy way to differentiate between these two models in the GUI and show the Power button only when Flirc-SE is connected. We're thinking with Jason on how to implement this. Right now, to record the Flirc-SE power button you need to use command line utility flirc_util.exe (it's in the Flirc's install folder). You need to start the cmd.exe, change current directory to Flirc's folder and then run flirc_util.exe record powerand then press your power button on the remote. Also make sure you're using latest software and firmware version. Sorry for asking the obvious but have you connected your power button through the Flirc-SE? As for the OpenElec and Flirc GUI, I can't help you much with that as I've never played with OpenElec. From what I know, it's now built around any other Linux distribution, but it's created from scratch just for running Kodi. So there's probably no desktop environment at all. But you should be able to upload a standard Linux binaries and then run them in terminal (command line) using SSH. I think it should be possible to upload flirc_util binary and use it to configure Flirc (from command line) running OpenElec.
-
It's the same product as the black magic probe, which is 70 dollars. I wanted something cost effective, and shared it. If you can't figure this out, you wont figure theirs out, because it's literally running the same firmware. A 55 dollar difference. Here is the correct command: dfu-util --device ,1d50:6017 -s 0x00002000:leave -D blackmagic.bin Please be kind on my forums.